Showing posts with label cookery. Show all posts

Thursday, June 2

Is it time for popsicles?

We made a return trip to the strawberry farm.
I wanted to lay in a good supply for the coming months!


And this time I brought along some picking power!


Toucie and my mom


Sodie


Mado


Naya


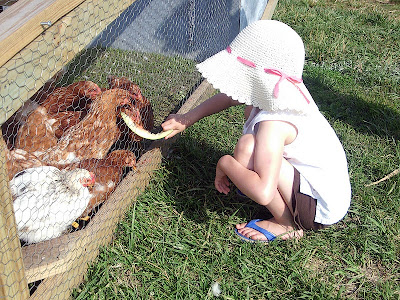
Toucie was seduced by the chickens and bailed on us right away


The rest of soldiered on and came away with 3 gallons to take home


I've been dreaming of making a homemade version
of the wonderful Mexican paletas we sometimes splurge on.


We capped and diced some berries, warmed them with
some honey,blended them up in the blender,
and froze them in our popsicle molds.


Then we decided to freeze every fruit we had on hand.
(Here are pear, cantaloup, peach, and strawberry)


Ok, Summer...now we are ready!

Wednesday, March 16

Great Green Garbanzos!


Look at these drool-worthy recipes....or these


With the quart or so of green garbanzos that we picked up at our local international foods market...


...we ended up just going the simplest route. ..a quick steam-boil in salted water.


Then we just popped them out of their husks and ate them like edamame...mmmm!


Look how cute they are :)


Now we've got to get some more so we can try some of the other yummy looking recipes!

Thursday, February 3

Candlemas/ Imbolc recipes


Homemade Fresh Ricotta Cheese

·          2 cups whole milk
·          1/4 teaspoon table salt
·          2 tablespoons distilled white vinegar or lemon juice

      1.    Line colander with four layers of cheesecloth or 2 layers of food-safe paper towels and set over large bowl. Combine milk, salt, and vinegar or lemon juice in microwave-safe glass 1-quart liquid measure. Microwave on high heat until lightly bubbling around edges, 2 to 4 minutes (milk should register about 165°F on an instant-read thermometer). Remove from microwave, and stir gently for 5 seconds. Milk should separate into solid white curds and translucent liquid whey. If not, microwave for 30 seconds longer. Repeat until fully separated.
2.     2.    Using slotted spoon or wire skimmer, transfer curds to prepared colander, cover exposed top with plastic wrap, and allow to drain until desired texture is reached. Store in covered container in refrigerator for up to 5 days.


Baked Ricotta on Flatbread
recipe here


Roasted Brussels Sprouts
one recipe here


Individual Pot Pies
crust recipe here - filling is just homemade gravy and veggies


Sprouted Crunchy Mix and Salad -didn't manage to photograph it :(
sprouts from here


Chocolate Volcano Cakes (in flowerpots!)
recipe here

Thursday, January 20

Most successful "soaked" bread recipe yet!


I can't believe I made this in my own kitchen...it looks like it came from a wood-fired oven in a small, rustic, European village. This is my latest attempt in baking homemade bread that uses soaked dough (to fall more closely in alignment with the principals of a traditional foods diet...or Nourishing Traditions fare).

In this recipe, 4 ingredients are thrown together in a bowl, covered, and left to rise overnight (12 - 20 hours). The next day, the dough is shaped into a ball, left to "nap" for another 2 hours, then baked in a covered dutch oven. There is no kneading...very little hands-on at all, in fact. I highly, highly recommend giving it a go...the recipe is here at Steamy Kitchen.

Sunday, November 28

November Baking....Doughnuts

So, let me come clean right way...this is actually deep fat frying, not baking at all, but we made the doughnuts on baking day...and, um, they are made from dough. I'm sure my logic is obvious and totally justified :)


Recently, during one of Toucie's visits to the hospital for a chemotherapy treatment, she saw a glossy photo on a magazine cover ...of homemade doughnuts. I flipped through the pages, scribbled down the recipe, and the very next day we were in the kitchen with our pot full of bubbling oil. After all, doughnuts are traditionally an autumn treat, and we are almost out of autumn!


(thanks for the pretty pictures, Mado!)


Here is the recipe we used from Better Homes and Gardens magazine (September 2010):


Ingredients


3 -1/2  cups  all-purpose flour
1  Tbsp.  baking powder
1  tsp.  ground cinnamon
3/4  tsp.  salt
1/2  tsp.  ground nutmeg
1/3  cup  milk
1/2  cup  butter, melted
4    eggs, beaten
2/3  cup  sugar
Vegetable oil for deep-fat frying
Cinnamon-Sugar or sifted powdered sugar


Directions


1. In a bowl combine flour, baking powder, cinnamon, salt and nutmeg; set aside. In another bowl combine milk and melted butter. In a large mixing bowl combine eggs, and sugar; beat with electric mixer until thick (about 5 minutes). Add milk mixture; stir with a wooden spoon to combine. Add flour mixture and stir with a wooden spoon until smooth. Cover dough; chill at least 2 hours (dough will remain slightly sticky).
2. Turn dough out onto a lightly floured surface. Roll dough to 1/2-inch thickness. Cut dough with a floured 2-1/2-inch round cutter. Use a 1-1/4-inch cutter to cut the hole for the doughnut. (You can also use a standard doughnut cutter.)
3. Fry 2 or 3 doughnuts at a time in deep hot fat (375 degrees F) for 2 to 2-1/2 minutes or until brown, turning halfway through cooking with a slotted spoon. Drain on paper towels. Repeat with remaining doughnuts and doughnut holes. Makes about 15 doughnuts and doughnut holes
4. Shake warm doughnuts in a bag with Cinnamon-Sugar or powdered sugar. Serve warm (or reheat each doughnut 8 to 10 seconds in microwave on high).
Cinnamon-Sugar: Stir together 1/2 cup granulated sugar and 1 tsp. ground cinnamon.

Tuesday, November 9

November Baking....Pumpkin Muffins


Even though Halloween is tucked away until the earth turns 'round once more, pumpkins are still featuring large around here! We are still making Pumpkin Pies...they don't last long around here. And a few days ago, we cut a pumpkin in half and used one part to make Pumpkin Soup...the other half, we baked and saved for Pumpkin Muffins - one of our very favorite things to eat!

Pumpkin Muffins

1/2 of a pumpkin, baked and scooped from its shell ( about 2 cups)
1/3 c coconut oil (or melted butter)
2 eggs
1/3 c applesauce
2/3 c raw sugar

1 1/2 c white wheat flour
1 tsp baking soda
1/2 tsp baking powder
1/2 tsp salt
1/4 tsp ground cloves
1/2 tsp grated nutmeg
1/4 tsp ground allspice
1 tsp cinnamon


-Preheat oven to 350 degrees and grease a muffin tin.
-Stir first 5 ingredients together in a bowl, mixing well and making sure the pumpkin is beaten quite smooth.
-In a separate bowl, blend the last 8 ingredients together.
-Add wet ingredients to dry ones and very gently mix...just enough to bring the ingredients together.
-Spoon into prepared muffin tin and bake at 350 for 30 minutes.
-Makes 1 dozen


These are also good with a handful of pumpkin seeds (or sunflower seeds, slivered almonds, chopped pecans, etc) thrown in with the dry ingredients...a sneaky dose of protein to go with all that secret vitamin A :)

Wednesday, November 3

Pumpkin Soup...for eating and reading


This is an autumn favorite of mine...I'll be so sad when Toucie outgrows this book! Pumpkin Soup is written and illustrated by Helen Cooper. It is the story of a cat, a squirrel, and a duck - three friends who live together, make music together, and cook pumpkin soup together, each contributing their special talents to the work.


Cat always peels and chops the pumpkin, squirrel always stirs in the water, and Duck always adds a pipkin of salt...what happens when their peaceful rhythm gets shaken up?


The magical illustrations plus the recipe at the end of the story make us want to run into the kitchen and stir up some soup!

Mado did the all the chopping.


Toucie found a tiny doll's teacup (it held a scant teaspoon) to use as a "pipkin" for our salt.


We all took turns stirring :)


Here is our own recipe for Pumpkin Soup:

1 medium onion chopped
3 Tbs. butter
1/2 of a jack-o-lantern pumpkin (because that's what we had), peeled and chopped (about 6 cups)
6 cups of water or broth
1 scant tsp salt
1/2 tsp black pepper
milk or cream to taste

-In a stockpot, saute onion in the butter until soft
-Add pumpkin and water or broth and salt
-Bring to a boil, then reduce heat and simmer gently until pumpkin is soft (about 30 minutes)
-In a blender, puree soup in batches, adding milk or cream to get desired consistancy, and returning soup to the pot when all is smooth
-Stir in black pepper to taste and adjust salt
-Serve immediately (serves 6-8)

(PS) we baked the other half of the pumpkin and refrigerated it to use next week for Pumpkin Muffins...it is much easier to scoop baked pumpkin out of the shell than it is to peel and chop a raw pumpkin!)

Tuesday, November 2

November Baking....Favorite Cornbread


I tend to gravitate towards themes in our kindergarten "lessons". Since our circletime revolves around the themes of autumn wind, grinding corn, and millers...baking cornbread seemed the natural thing to follow. Some of the fall harvest festivals around our area include old-fashioned, steam-driven corn mill demonstrations. What a thrill to take home cornmeal that was ground before your very own eyes and then turn it into bread!

This is our family's go-to recipe - its adapted from Jeanne Lemlin's book, Vegetarian Pleasures:


Cornbread

1 1/2 cups cornmeal
3/4 cups flour (we use white whole wheat)
4 tsp. baking powder
1/2 tsp. salt

1/4 cup honey
3 Tbs. melted butter
1 1/4 cups milk
1 egg

-Preheat oven to 400 degrees (375 if using a glass pan)
-Grease an 8" or 9" iron skillet or an 8x8 baking pan
-In a mixing bowl, whisk together the dry ingredients
-In a smaller bowl, thoroughly mix together the wet ingredients
-Add wet ingredients to dry ones and stir just until blended
-Pour batter into prepared pan and bake for 25 minutes or until a knife inserted into the center comes out clean.
-Serve immediately (6-8 servings)

Wednesday, June 16

Lemonade


Its hard to be a "locavore" when such summery essentials as lemons are not at the community farmstand. I try, but I make lots and lots of exceptions (life without avocados? no way!). Lemonade = summertime, as far as I'm concerned, so lemons are one of those exceptions. Here is what we did with ours today:


3 large lemons, juiced
1 scant cup of sugar
2 qts. water
a few drops of our secret ingredient:


Orange Blossom Water ( Zharr in arabic...available at Middle Eastern groceries...like Rose Water)


Saved one of these for sipping from :)


Delightful! We froze some in popsicle molds, too.

When we have more time (patience?), I'd like to try some other variations, like Herbal Lemonade, Ginger Lemonade, or Lavender Lemonade ....mmmmmm!

Monday, March 22

Recipes from our Equinox feasting...

Warm and Spicy Indonesian Peanut Dip
-----------------------------------------
1 or 2 cloves garlic
1 inch cube of peeled fresh ginger
1 jalepeno pepper, seeded and deveined (or chile pepper of your choice)
1/2c coconut milk
1/4 c water
1Tbs tamari
1c natural unsweetened peanut butter (preferably chunky, but smooth works, too)
juice of half a lime (or lemon)
handful of chopped cilantro 
1/4 c of desicated coconut (optional)
--------------------------------------
Place garlic, ginger, jalepeno, coconut milk, water, and tamari in a blender and blend until all is pulverized.
Add peanut butter and lime juice and quickly pulse just until peanut butter is incorporated.
Turn mixture into a small saucepan and warm on the stove over medium heat just until it begins to bubble.
Stir in cilantro and dessicated coconut (if using) and serve immediately with raw veggies.
(We used thick slices of cucumbers, carrot sticks, red pepper strips, and sugarsnap peas)
Makes almost 2 cups of dip...leftovers blended with additional coconut milk  to thin make an AWESOME pasta sauce .


Lemon-Spinach Orzo Soup
-----------------------------------
3/4c orzo
1 onion - chopped (can substitute 3 leeks , especially in springtime!)
1 bell pepper - chopped (preferably a yellow, orange, or red one)
3-5 cloves garlic - chopped
olive oil for sauteing the above
6 c broth (veggie or chicken)
4c chopped fresh raw spinach
1/2 c chopped parsley
juice of 1 lemon
salt and freshly ground pepper to taste
-----------------------------------------
Cook orzo until al dente , drain, rinse well in cold water, and set aside.
In a soup pot, saute onion, pepper and garlic in olive oil until soft.
Add broth and bring up to a simmer...simmer for 10 minutes.
Add fresh spinach, parsley, cooked orzo, lemon juice, salt and pepper.
Serve immediately...serves 6


Spanish Potato Torta  (Sodie's specialty)
----------------------------------------------
1lb. red potatoes - peeled and sliced thinly - 1/8th  inch if possible
1 large yellow onion - sliced into thin rings
3Tbs olive oil
5 eggs - beaten
salt and pepper to taste
sour cream blended with chopped parsley (or other herbs) to serve
-------------------------------------------------------------------
*In a 12" well-seasoned pan (or nonstick omelet pan) heat olive oil and gently cook potatoes and onions over medium heat for about 12 minutes, or until potatoes soften.
*Season the beaten eggs with salt and pepper (potatoes can take a good dose of salt!) and pour into the pan over the onion/potato mixture.
*Quickly stir it all around just enough to make sure the eggs have coated all the potatoes.
*Cook gently over medium-low heat until eggs begin to set.
*To flip the torta over and cook the other side, place a large dinner plate over the top and holding the plate with one hand and the pan handle with the other, flip the torta upside-down onto the plate. Then slide it back into the pan with the golden-brown cooked side facing up.
*Let  the bottom set and slide onto a serving dish. Serve with sour cream if desired
*Serves 12 as an appetizer, 6 as a side dish, or 4 as a main dish
*May be served hot, but is traditionally served at room temperature.

Friday, March 19

Teenagers and Margheritas

Mado's boyfriend came over to hang out with us today. He's a strapping, tough lad with an array of piercings and a streetwise attitude. He also happens to love to cook. He brought a cookbook with him. "Let's make pizzas", he said. Awesome.


Toucie ("Hi, I'm four and five fifths years old!") naturally placed herself in the center of the action. And that is how I came to have two 16 year olds and one kindergartener messing around with Margheritas this afternoon in my kitchen.

(prep work)


(that basil smelled so good...)
Look at Toucie's "doughn-izza"...pizza crust with a big hole in the middle - doughnut style.


YES!!! (this is why I had children)


Our adaptation of Williams Sonoma's Pizza Margherita:

Use your favorite pizza dough recipe (we made enough dough for four 12 inch pizzas).
Assemble the following toppings:
-12 roma tomatoes -diced (remove seeds, just use the firm flesh)
-1 lb. mozzerella -grated
-1 cup (or more!!) of fresh basil leaves-torn
- olive oil to drizzle
-salt and freshly ground pepper
Shape your dough into 12 inch rounds - as thin as you can make it - and place on pizza pans
Cover with toppings in this order:
-cheese
-tomatoes
-basil
-salt and pepper
-generous drizzle of olive oil
Bake at 450 degrees F for 10 minutes, then reduce heat to 400 and continue baking for 10 more minutes
Hug and kiss the children that made you the pizza and enjoy it together.
(Thanks Mado, C, and Toucie !)